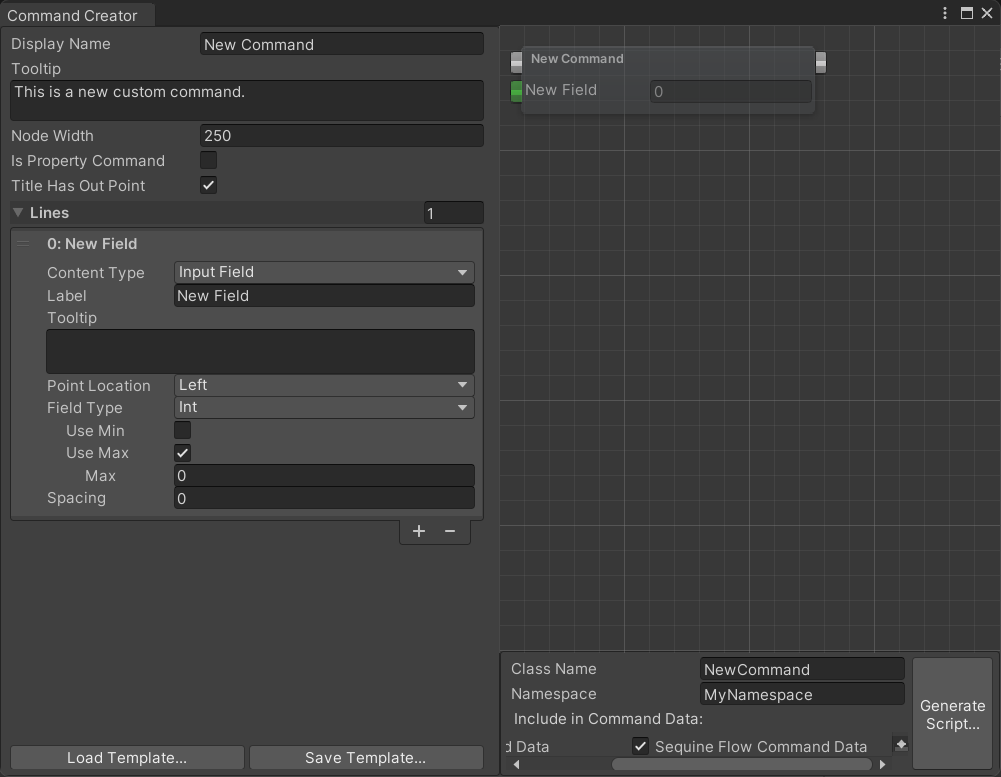
Command Creator 窗口
信息
自 1.6.0 版本起,如果我们使用 ICommandAutoDraw 接口,就不再必须依赖这个 Command Creator Window。不过,当你需要绘制更加高级或更动态的节点时,它仍然会很有帮助。
打开 Command Creator 窗口
创建一个 Command,尤其是复杂的 Command,会因为大量样板代码而变得很麻烦。
因此,希奎引提供了一个 Command Creator 窗口。它可以通过带有可视化界面的窗口来帮助生成 Command 脚本,让你直观地看到生成后的 Command 会是什么样子。
它只负责生成与绘制相关的代码,从而让我们可以把更多精力放在 Command 的行为逻辑上。
要打开这个窗口,在菜单栏中点击 Tools -> Sequine -> Command Creator...
创建示例 Command
让我们创建一个示例 Command。
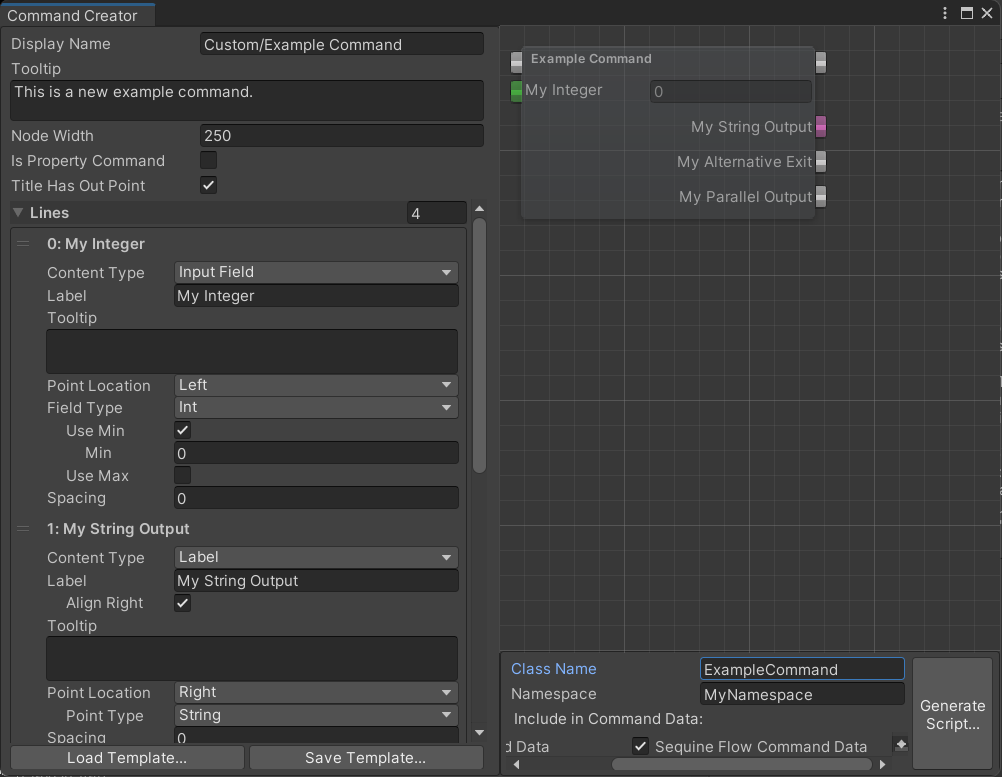
我们还可以保存或加载配置模板。保存模板时,会生成一个 json 文件。
下面是上述示例 Command 对应的 json 输出。你可以把它粘贴到一个 json 文件中,然后通过 Load Template... 按钮进行加载。
ExampleCommand.json
{"displayName":"Custom/Example Command","tooltip":"This is a new example command.","nodeWidth":250.0,"isPropertyCommand":false,"titleHasOutPoint":true,"lines":[{"contentType":0,"label":"My Integer","tooltip":"","pointLocation":1,"pointType":0,"outMainType":0,"alignRight":false,"fieldType":5,"lineCount":2,"wordWrap":true,"useMin":true,"useMax":false,"min":0.0,"max":0.0,"allowSceneObjects":true,"spacing":0.0},{"contentType":1,"label":"My String Output","tooltip":"","pointLocation":2,"pointType":4,"outMainType":0,"alignRight":true,"fieldType":5,"lineCount":2,"wordWrap":true,"useMin":true,"useMax":false,"min":0.0,"max":0.0,"allowSceneObjects":true,"spacing":0.0},{"contentType":1,"label":"My Alternative Exit","tooltip":"","pointLocation":2,"pointType":0,"outMainType":0,"alignRight":true,"fieldType":5,"lineCount":2,"wordWrap":true,"useMin":true,"useMax":false,"min":0.0,"max":0.0,"allowSceneObjects":true,"spacing":0.0},{"contentType":1,"label":"My Parallel Output","tooltip":"","pointLocation":2,"pointType":0,"outMainType":1,"alignRight":true,"fieldType":5,"lineCount":2,"wordWrap":true,"useMin":true,"useMax":false,"min":0.0,"max":0.0,"allowSceneObjects":true,"spacing":0.0}],"className":"ExampleCommand","_namespace":"MyNamespace","includedCommandData":[{"name":"Level Command Data","include":false},{"name":"Sequine Flow Command Data","include":true}]}
要生成实际的 Command 脚本,我们可以点击 Generate Script... 按钮。
下面是生成后的脚本示例。
ExampleCommand.cs
using Calcatz.CookieCutter;
using System.Collections;
using System.Collections.Generic;
using UnityEngine;

namespace MyNamespace {

    [System.Serializable]
    [RegisterCommand("Custom/Example Command", typeof(Calcatz.Sequine.SequineFlowCommandData))]
    public class ExampleCommand : Command {

        public override void Execute(CommandExecutionFlow _flow) {
            var myInteger_value = GetInput<System.Int32>(_flow, IN_PORT_MY_INTEGER, myInteger);

            //....................................
            //...YOUR EXECUTION LOGIC GOES HERE...
            //....................................

            RunSubFlow(_flow, OUT_PORT_MY_PARALLEL_OUTPUT);
            Exit();
        }

        public override T GetOutput<T>(CommandExecutionFlow _flow, int _pointIndex) {
            switch(_pointIndex) {

                case OUT_PORT_MY_STRING_OUTPUT:
                    //...YOUR EVALUATION LOGIC GOES HERE...
                    return (T)(object)"";

                default:
                    Debug.LogError("Output port index does not exist in ExampleCommand: " + _pointIndex);
                    return default(T);
            }
        }

        public override int GetNextOutputIndex() {
            //You can change exitPortIndex in Execute method by your desired condition
            return exitPortIndex;
        }

        #region PROPERTIES

        private int exitPortIndex = 0;

        public override float nodeWidth => 250f;

        private const int IN_PORT_MY_INTEGER = 0;

        private const int OUT_PORT_MY_STRING_OUTPUT = 1;
        private const int OUT_PORT_MY_ALTERNATIVE_EXIT = 2;
        private const int OUT_PORT_MY_PARALLEL_OUTPUT = 3;

        public System.Int32 myInteger;
        #endregion PROPERTIES

        #region NODE-DRAWER
#if UNITY_EDITOR
        public override void Editor_InitInPoints() {
            CommandGUI.AddMainInPoint();
            if (inputIds.Count <= IN_PORT_MY_INTEGER) {
                inputIds.Add(new ConnectionTarget());
            }
            CommandGUI.AddPropertyInPoint<System.Int32>();
        }

        public override void Editor_InitOutPoints() {
            CommandGUI.AddMainOutPoint();
            if (nextIds.Count <= OUT_PORT_MY_STRING_OUTPUT) {
                nextIds.Add(new List<ConnectionTarget>());
            }
            if (nextIds.Count <= OUT_PORT_MY_ALTERNATIVE_EXIT) {
                nextIds.Add(new List<ConnectionTarget>());
            }
            if (nextIds.Count <= OUT_PORT_MY_PARALLEL_OUTPUT) {
                nextIds.Add(new List<ConnectionTarget>());
            }
            CommandGUI.AddPropertyOutPoint<System.String>();
            CommandGUI.AddMainOutPoint();
            CommandGUI.AddMainOutPoint();
        }

        public override void Editor_OnDrawTitle(out string _tooltip) {
            _tooltip = @"This is a new example command.";
            CommandGUI.DrawInPoint(0);
            CommandGUI.DrawOutPoint(0);
        }

        public override void Editor_OnDrawContents(Vector2 _absPosition) {
            CommandGUI.DrawInPoint(IN_PORT_MY_INTEGER + 1);
            if (inputIds[IN_PORT_MY_INTEGER].targetId == 0) {
                CommandGUI.DrawIntField("My Integer", "", ref myInteger, 0);
            }
            else {
                CommandGUI.DrawLabel("My Integer");
            }
            CommandGUI.DrawOutPoint(OUT_PORT_MY_STRING_OUTPUT);
            CommandGUI.DrawLabel("My String Output", true);
            CommandGUI.DrawOutPoint(OUT_PORT_MY_ALTERNATIVE_EXIT);
            CommandGUI.DrawLabel("My Alternative Exit", true);
            CommandGUI.DrawOutPoint(OUT_PORT_MY_PARALLEL_OUTPUT);
            CommandGUI.DrawLabel("My Parallel Output", true);
        }

#endif
        #endregion NODE-DRAWER

    }

}
可以看到,它已经为我们生成了所有的样板代码。接下来我们只需要在 Execute、GetOutput、GetNextOutputIndex 等方法中编写真正的功能逻辑即可。
PROPERTIES 和 NODE-DRAWER 区域中的内容则不需要我们去处理。