自定义 Command 类型
自 1.6.0 版本起,引入了 ICommandAutoDraw 接口,它省去了手动绘制 Command 所需的样板代码。相关内容将在 Auto Draw Command 中说明。不过,仍然建议你先阅读本页,以更好地理解 Command 的工作方式。
我们可以创建新的 Command 类型,无论是 Main Command 还是 Property Command。为了更容易理解,我们通过示例来学习。
本指南将带你创建一个 Main Command,它使用 Debug.Log 打印字符串,并接收一个字符串作为输入。
随后,我们还会创建一个 Property Command,用于输出一个字符串,并将其作为 Main Command 的输入。
1. Main Command
创建新的 Command 脚本
打开 Assets 菜单,选择 Create -> Sequine -> C# Command Script,创建一个新的 Command 脚本。将文件命名为 PrintCommand(可选)。

打开脚本后,默认内容如下:
using System.Collections;
using System.Collections.Generic;
using UnityEngine;
using Calcatz.Sequine;
using Calcatz.CookieCutter;

[System.Serializable]
[RegisterCommand("Custom/PrintCommand", typeof(SequineFlowCommandData))]
public class PrintCommand : Command
{
    public override void Execute(CommandExecutionFlow _flow)
    {
        //Your logic here... (Before Exit Method)
        Exit();
    }
}
[System.Serializable]用于让我们的 Command 可以通过public字段或[SerializeField]特性实现序列化。[RegisterCommand]是一个用于注册 Command 的特性,使其能够出现在 Create Command 的上下文菜单中(通过右键打开)。- pathName: Command Node 显示的名称。你可以使用
/来组织路径,从而对 Command 进行分类。 - commandDataTypes: 该 Command 可使用的数据作用域。除非你打算深入学习 更底层 的内容,否则这里通常都会是
SequineFlowCommandData。
- pathName: Command Node 显示的名称。你可以使用
Command是所有 Main Command 的基类。Execute方法会在主连接(白色连接)访问到该 Command 时被调用。
回到 Unity 编辑器,在完成编译后,你会看到新创建的 Command 已经出现在创建 Command 的上下文菜单中了。

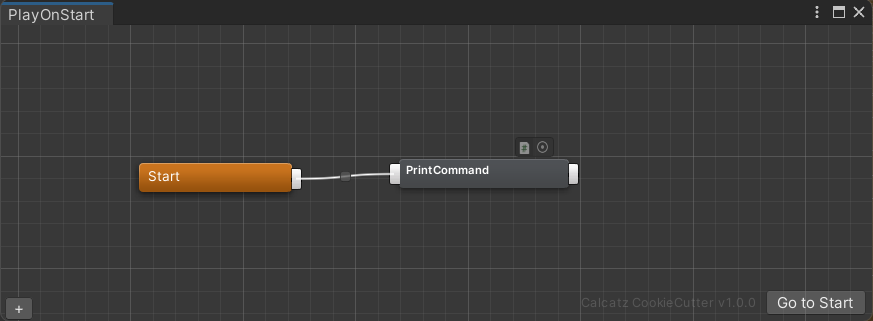
目前,这个 Command 在执行时还不会做任何事情,接下来我们将学习如何让它产生实际效果。
定义 Execute 方法
接下来,我们可以在 Execute 方法中定义这个 Command 需要执行的逻辑。需要注意的是,我们必须在某个位置调用 Exit 方法,理想情况下是在流程的最后,用于结束当前 Command 并进入下一个 Command。调用 base.Execute(_flow) 也是可以的,因为它同样会调用 Exit 方法。
请确保不要调用 Exit 两次。例如,如果已经使用了 base.Execute(_flow),就不需要再额外调用 Exit。
由于我们的 Command 需要打印一个字符串,那么我们可以创建一个字符串字段,并在 Execute 方法中将它输出。
...
[System.Serializable]
[RegisterCommand("Custom/PrintCommand", typeof(SequineFlowCommandData))]
public class PrintCommand : Command
{
    public override void Execute(CommandExecutionFlow _flow)
    {
        string textToPrint = "Hello World!";
        Debug.Log(textToPrint);
        Exit();
    }
}
进入 Play Mode 并执行我们的 Sequine Flow。当执行后,你会看到它打印出 Hello World! 这个字符串。

绘制字段
目前这种方式的灵活性还不够,因为我们必须把字符串写死在代码里。假设我们希望可以直接在 Command Node 上编辑文本,那么就需要绘制一个 TextField。
还记得我们的类带有 [System.Serializable] 特性。这意味着我们可以使用 public 字段或 [SerializeField],从而让该字段被序列化,并能够在编辑器中进行修改。因此,现在不要把 textToPrint 声明在 Execute 方法内部,而是把它移到外面,作为一个 public 字段。
...
public class PrintCommand : Command
{
    public string textToPrint = "Hello World!";

    public override void Execute(CommandExecutionFlow _flow)
    {
        Debug.Log(textToPrint);
        Exit();
    }
}
目前,textToPrint 字段已经被序列化,但还不会显示在 Command Node 中。要把这个字段绘制出来,我们需要使用 CommandGUI。它是一个用于绘制各种类型字段的工具类。你可以查看 Scripting API 来了解所有可用的绘制方法。不过现在,我们只使用 DrawTextField 方法来绘制一个单行字符串字段。
我们不能在任意地方调用 CommandGUI.DrawTextField。只能在需要被重写的 Editor_OnDrawContents 方法中进行绘制。
任何以 Editor_ 开头的方法都只能在 Editor 中调用,而不能在游戏的 Build 版本中存在。如果脚本中包含这些方法,在构建游戏时就会报错。因此,我们必须把所有以 Editor_ 开头的方法放在 #if UNITY_EDITOR 预处理指令中。被包含在 #if UNITY_EDITOR 内的代码,在构建版本中会被移除。如果想了解更多,可以阅读团结引擎的 条件编译
。
下面是我们应该如何重写 Editor_OnDrawContents 方法。
...
public class PrintCommand : Command
{
    public string textToPrint = "Hello World!";

    public override void Execute(CommandExecutionFlow _flow)
    {
        Debug.Log(textToPrint);
        Exit();
    }

#if UNITY_EDITOR
    public override void Editor_OnDrawContents(Vector2 _absPosition)
    {

    }
#endif

}
现在,我们终于可以在 Editor_OnDrawContents 方法中编写用于绘制的代码了。
...

#if UNITY_EDITOR
    public override void Editor_OnDrawContents(Vector2 _absPosition) {
        CommandGUI.DrawTextField(
            "Text to Print",
            "The text to print using this command.",
            ref textToPrint);
    }
#endif
...
以下是 CommandGUI 绘制方法通常包含的参数:
- label:显示在 Command Node 内部的标签文本。
- tooltip:当鼠标悬停在字段上时显示的提示信息。
- target:我们希望修改的字段目标。需要注意的是,它要求使用
ref关键字,这样方法才能通过引用传递并直接修改其值,而不是按值传递。
现在回到 Unity,看一下我们的 Command 显示效果。

可以看到,由于空间不足,我们无法清楚地阅读标签内容。
我们可以通过重写 nodeWidth 属性来修改 Command Node 的宽度。让我们尝试把它增加到 200。
...
public class PrintCommand : Command
{
    public override float nodeWidth => 200;

    public string textToPrint = "Hello World!";

    public override void Execute(CommandExecutionFlow _flow)
    {
        Debug.Log(textToPrint);
        Exit();
    }
    ...
}
回到 Unity,现在我们可以更清楚地看到这个字段了。尝试修改它的值,然后运行看看效果。

绘制 In-Point 作为输入
我们已经让 textToPrint 字段可以在 Command Node 中进行编辑。但如果我们希望传入一个动态值,而不是填写固定的字符串,该怎么办?
在这种情况下,我们就需要添加一个 in-point,并同样在 Editor_OnDrawContents 中将它绘制出来。
不过在绘制之前,需要先确保已经添加了输入端口。我们可以通过修改 inputIds 属性来添加输入端口。inputIds 包含一个连接目标列表,用于存储每个输入所引用的 Command Id。
在这里,因为 textToPrint 只需要 1 个输入,所以需要保证 inputIds 的数量为 1。
这一步需要在 Editor_InitInPoints 方法中完成,而这个方法同样是可以被重写的。
#if UNITY_EDITOR
    public override void Editor_InitInPoints()
    {
        base.Editor_InitInPoints();
        if (inputIds.Count < 1) inputIds.Add(new ConnectionTarget());
    }

    public override void Editor_OnDrawContents(Vector2 _absPosition)
    {
        CommandGUI.DrawTextField(
            "Text to Print",
            "The text to print using this command.",
            ref textToPrint);
    }
#endif
在确保 inputIds 设置完成之后,我们还需要添加一个 in-point。如果你对两者的区别感到困惑,可以这样理解:inputIds 是实际存储连接目标信息的 数据,而 in-point 是绘制器,只负责绘制可点击的输入点。
通过使用 CommandGUI,我们可以使用 AddMainInPoint 方法来添加一个 main in-point,也可以使用 AddPropertyInPoint 方法来添加一个 property in-point。
在当前这个例子中,因为我们需要一个用于输入字符串的 in-point,所以将使用 AddPropertyInPoint 方法,并把 string 指定为类型参数。
...
    public override void Editor_InitInPoints()
    {
        base.Editor_InitInPoints();
        if (inputIds.Count < 1) inputIds.Add(new ConnectionTarget());
        CommandGUI.AddPropertyInPoint<string>();
    }
...
不过,仅仅添加 in-point 还不够。我们还需要使用 DrawInPoint 方法将它绘制出来,并传入该 in-point 的索引作为参数。
#if UNITY_EDITOR
    public override void Editor_InitInPoints()
    {
        base.Editor_InitInPoints();
        if (inputIds.Count < 1) inputIds.Add(new ConnectionTarget());
        CommandGUI.AddPropertyInPoint<string>();
    }

    public override void Editor_OnDrawContents(Vector2 _absPosition)
    {
        CommandGUI.DrawInPoint(1);
        CommandGUI.DrawTextField(
            "Text to Print",
            "The text to print using this command.",
            ref textToPrint);
    }
#endif
现在你可能会疑惑,为什么在 DrawInPoint 中传入的是 1 而不是 0。这是因为当我们调用 base.Editor_InitInPoints() 时,系统已经先添加了一个 main in-point。还记得我们的 Command 一开始就有一个 白色的 in-point 吗,这就是它的来源。
因此,在这个例子中:
- 索引为 0 的 in-point 是 main in-point
- 索引为 1 的 in-point 是字符串类型的 property in-point

使用来自 In-Point 的输入
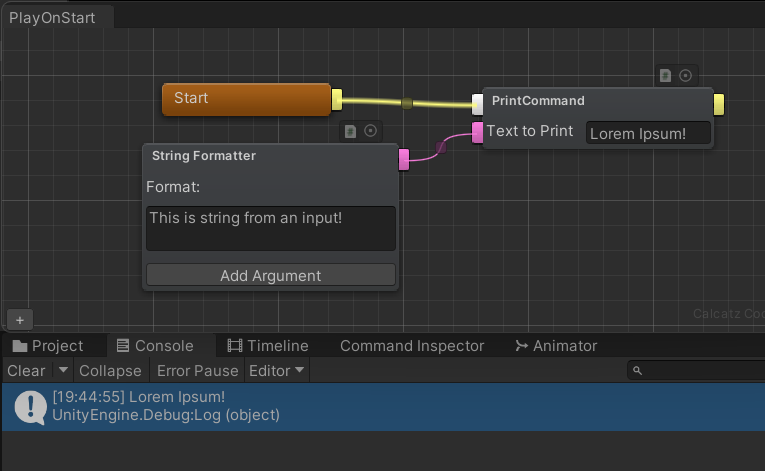
我们可以使用 String Formatter Command 来生成一个字符串,并尝试把它作为输入。
当我们运行时,你会发现它忽略了输入,而仍然打印 Text Field 中的文本。
这是因为我们目前还没有真正使用这个输入。
要使用来自输入端口的值,我们需要调用 GetInput 方法。这个调用必须发生在 Execute 方法被调用的同一帧内。因为如果在之后的某一帧异步调用,_flow 的状态可能已经发生变化,从而不再有效。
现在回到我们的 Execute 方法,对它进行修改。
...
    public override void Execute(CommandExecutionFlow _flow)
    {
        string value_textToPrint = GetInput<string>(_flow, 0, textToPrint);
        Debug.Log(value_textToPrint);
        Exit();
    }
...
GetInput 方法返回的是一个泛型 object 类型,这就是为什么它需要一个类型参数来进行转换,在这里就是 string。下面是它的参数说明:
- flow:Command 执行的流程上下文。我们可以直接传入
Execute方法提供的_flow。关于 flow,我们会在后面的 替代出口与并行流程 章节中介绍。 - index:
inputIds的输入索引。 - defaultValue:当 in-point 未连接时所使用的默认值。
如果用人话来解释就是:
从 index 0 的 in-point 获取输入值,如果该输入 为空,则改为使用 textToPrint 字段中的值。
现在我们可以再次运行看看效果,只要输入存在,它就会打印来自输入端口的值。

优化显示效果
在功能层面,我们的 Command 已经可以正常工作了。不过有一点可能会让用户感到困惑,那就是很难直观看出最终到底会打印哪个值。String Formatter 提供的值和 textToPrint 字段中的值都会同时显示。
为了让界面更直观,我们可以在输入已连接时隐藏 textToPrint 字段。
我们需要通过检查 inputIds 在索引 0 处是否已连接来判断,这可以通过查看 targetId 的值实现。当 targetId 为 0 时,表示它没有引用任何 Command,也就是未连接。当 targetId 为 0(未连接)时,我们绘制 Text Field;否则,只绘制标签即可。
...
    public override void Editor_OnDrawContents(Vector2 _absPosition)
    {
        CommandGUI.DrawInPoint(1);
        if (inputIds[0].targetId == 0)
        {
            CommandGUI.DrawTextField(
                "Text to Print",
                "The text to print using this command.",
                ref textToPrint);
        } else
        {
            CommandGUI.DrawLabel(
                "Text to Print",
                "The text to print using this command.");
        }
    }
...

另外,如果你熟悉 Unity Editor 的 IMGUI 编程,也可以在 Editor_OnDrawContents 方法中绘制任何你想要的内容。
2. Property Command
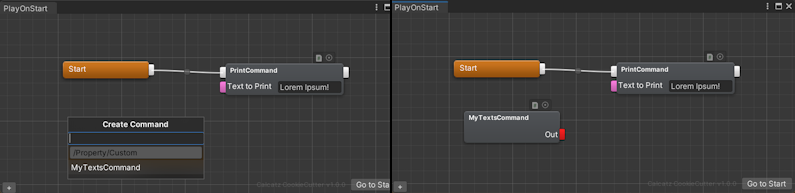
现在我们已经有了 PrintCommand,它是一个用于打印字符串的 Main Command。接下来,我们再创建一个名为 MyTextsCommand 的 Property Command,它包含多个字符串输出,可以作为 PrintCommand 的输入。
再次提醒,Property Command 是一种完全没有 main 白色 in-point 和 out-point 的 Command。
之前我们使用了 String Formatter 作为输入。但它已经由希奎引提供,如果不自己创建一个,就无法真正学习 Property Command 的实现方式。
创建新的 Property Command 脚本
打开 Assets 菜单,选择 Create -> Sequine -> C# Property Command Script,创建一个新的 Property Command 脚本。将文件命名为 MyTextsCommand(可选)。

打开脚本后,默认内容如下。
using System.Collections;
using System.Collections.Generic;
using UnityEngine;
using Calcatz.Sequine;
using Calcatz.CookieCutter;

[System.Serializable]
[RegisterCommand("Custom/MyTextsCommand", typeof(SequineFlowCommandData))]
public class MyTextsCommand : PropertyCommand<float>
{
    public override float GetOutput(CommandExecutionFlow _flow, int _pointIndex)
    {
        switch(_pointIndex)
        {
            case 0:
                float valueToReturn = 1f;
                //Your logic here...
                return valueToReturn;
            default:
                return 0f;
        }
    }

#if UNITY_EDITOR
    public override void Editor_InitOutPoints()
    {
        if (nextIds.Count < 1) nextIds.Add(new List<ConnectionTarget>());
        CommandGUI.AddPropertyOutPoint<float>();
    }

    public override void Editor_OnDrawContents(Vector2 _absPosition)
    {
        CommandGUI.DrawOutPoint(0);
        CommandGUI.DrawLabel("Out", true);
    }
#endif
}
PropertyCommand是所有 Property Command 的基类。这也会让该 Command 自动出现在 Create Command 上下文菜单中的 Property 分类下。GetOutput方法会在其他 Command 访问该 Command 的某个 out-point 时被调用。
在实现上,它主要使用 GetOutput 方法。Property Command 不需要被执行,因此也不需要调用 Exit。
目前,该 Command 输出的是一个 float,因此无法作为 PrintCommand 的输入进行连接。接下来我们将学习如何让它输出字符串。
定义 GetOutput 方法
我们可以在 GetOutput 方法中定义当获取输出时返回什么值。
由于我们需要输出字符串,那么就创建一个字符串变量,并将它作为输出返回。同时,还需要把 PropertyCommand 的泛型类型参数从 <float> 改为 string。修改类型参数后,也要将 GetOutput 方法的返回类型改为相同的类型。
到这里,你应该已经熟悉 Editor_InitOutPoints 方法了。我们需要把 CommandGUI.AddPropertyOutPoint 的类型参数从 float 改为 string,这样 out-point 就会被绘制为字符串类型的端口(粉色),而不是 float 类型(浅蓝色)。
我们可以使用 CommandGUI.DrawLabel 方法来绘制一个标签。如果希望右对齐,可以将第二个参数传入 true。
...
public class MyTextsCommand : PropertyCommand<string>
{
    public override string GetOutput(CommandExecutionFlow _flow, int _pointIndex)
    {
        switch(_pointIndex)
        {
            case 0:
                string text1 = "I am Text 1!";
                return text1;
            default:
                return null;
        }
    }

#if UNITY_EDITOR
    public override void Editor_InitOutPoints()
    {
        if (nextIds.Count < 1) nextIds.Add(new List<ConnectionTarget>());
        CommandGUI.AddPropertyOutPoint<string>();
    }

    public override void Editor_OnDrawContents(Vector2 _absPosition)
    {
        CommandGUI.DrawOutPoint(0);
        CommandGUI.DrawLabel("Out", true);
    }
#endif
}
编译完成后,尝试将 MyTextsCommand 的输出连接到 PrintCommand。
进入 Play Mode 并执行 Sequine Flow。执行之后,你会看到它打印出 I am Text 1! 这个字符串。

添加更多 Out-Point
现在我们来再添加一个 out-point,这样就可以选择希望使用哪个输出。
- 之前我们已经知道,输入需要在
Editor_InitInPoints中进行准备。那么对于输出,就需要在Editor_InitOutPoints中进行准备。 - 如果输入有用于存储引用数据的
inputIds,那么输出同样也有对应的引用数据容器,也就是nextIds(对于 main out-point 来说就是下一个 Command)。 - 如果我们用
CommandGUI.AddPropertyInPoint来添加 in-point,那么同样有CommandGUI.AddPropertyOutPoint用来添加 out-point。 - 如果使用
CommandGUI.DrawInPoint来绘制 in-point,那么也有CommandGUI.DrawOutPoint用于绘制 out-point。
现在我们创建 2 个输出,第一个输出 I am Text 1!,第二个输出 I am Text 2!。
要定义在某个 out-point 索引下输出哪个值,只需要根据 GetOutput 方法传入的 pointIndex 参数来判断即可。
你可以使用条件语句来选择输出内容,或者如果希望更高效,也可以使用数组、列表或字典等集合。
这里我们先采用简单的 switch-case 方式,当 pointIndex 为 0 时返回 text1,当为 1 时返回 text2。
...
public class MyTextsCommand : PropertyCommand<string>
{
    public override string GetOutput(CommandExecutionFlow _flow, int _pointIndex)
    {
        switch(_pointIndex)
        {
            case 0:
                string text1 = "I am Text 1!";
                return text1;
            case 1:
                string text2 = "I am Text 2!";
                return text2;
            default:
                return null;
        }
    }

#if UNITY_EDITOR
    public override void Editor_InitOutPoints()
    {
        if (nextIds.Count < 1) nextIds.Add(new List<ConnectionTarget>());   //This is for text1
        CommandGUI.AddPropertyOutPoint<string>();

        if (nextIds.Count < 2) nextIds.Add(new List<ConnectionTarget>());   //This is for text2
        CommandGUI.AddPropertyOutPoint<string>();
    }

    public override void Editor_OnDrawContents(Vector2 _absPosition)
    {
        CommandGUI.DrawOutPoint(0);
        CommandGUI.DrawLabel("Text1", true);
        CommandGUI.DrawOutPoint(1);
        CommandGUI.DrawLabel("Text2", true);
    }
#endif
}

完整代码
using System.Collections;
using System.Collections.Generic;
using UnityEngine;
using Calcatz.Sequine;
using Calcatz.CookieCutter;

[System.Serializable]
[RegisterCommand("Custom/PrintCommand", typeof(SequineFlowCommandData))]
public class PrintCommand : Command
{
    public override float nodeWidth => 200;

    public string textToPrint = "Hello World!";

    public override void Execute(CommandExecutionFlow _flow)
    {
        string value_textToPrint = GetInput<string>(_flow, 0, textToPrint);
        Debug.Log(value_textToPrint);
        Exit();
    }

#if UNITY_EDITOR
    public override void Editor_InitInPoints()
    {
        base.Editor_InitInPoints();
        if (inputIds.Count < 1) inputIds.Add(new ConnectionTarget());
        CommandGUI.AddPropertyInPoint<string>();
    }

    public override void Editor_OnDrawContents(Vector2 _absPosition)
    {
        CommandGUI.DrawInPoint(1);
        if (inputIds[0].targetId == 0) {
            CommandGUI.DrawTextField(
                "Text to Print",
                "The text to print using this command.",
                ref textToPrint);
        }
        else {
            CommandGUI.DrawLabel(
                "Text to Print",
                "The text to print using this command.");
        }
    }
#endif

}
using System.Collections;
using System.Collections.Generic;
using UnityEngine;
using Calcatz.Sequine;
using Calcatz.CookieCutter;

[System.Serializable]
[RegisterCommand("Custom/MyTextsCommand", typeof(SequineFlowCommandData))]
public class MyTextsCommand : PropertyCommand<string>
{
    public override string GetOutput(CommandExecutionFlow _flow, int _pointIndex)
    {
        switch(_pointIndex)
        {
            case 0:
                string text1 = "I am Text 1!";
                return text1;
            case 1:
                string text2 = "I am Text 2!";
                return text2;
            default:
                return null;
        }
    }

#if UNITY_EDITOR
    public override void Editor_InitOutPoints()
    {
        if (nextIds.Count < 1) nextIds.Add(new List<ConnectionTarget>());   //This is for text1
        CommandGUI.AddPropertyOutPoint<string>();

        if (nextIds.Count < 2) nextIds.Add(new List<ConnectionTarget>());   //This is for text2
        CommandGUI.AddPropertyOutPoint<string>();
    }

    public override void Editor_OnDrawContents(Vector2 _absPosition)
    {
        CommandGUI.DrawOutPoint(0);
        CommandGUI.DrawLabel("Text1", true);
        CommandGUI.DrawOutPoint(1);
        CommandGUI.DrawLabel("Text2", true);
    }
#endif
}
Main Command vs Property Command
虽然 Command 看起来被严格划分为两种类型,但实际上,这两种类型更多只是语义上的区分,用来区分它们的用途。
从技术上来说,Main Command 也完全可以拥有 property out-point,并且使用 GetOutput 方法。同样,Property Command 也可以拥有 main out-point,并且使用 Execute 方法。
另外,就像 PropertyCommand 一样,我们也可以在 Command 中使用泛型参数 <T...> 来定义 Command 的 GetOutput 方法的输出类型。
实际上,下面是 PropertyCommand 的真实源码。它与 Command 类几乎没有区别,主要只是移除了基类中的一些默认方法,从而去掉了原本默认会添加的 main in-point 和 main out-point。
namespace Calcatz.CookieCutter {

    [System.Serializable]
    public abstract class PropertyCommand : Command {

#if UNITY_EDITOR
        public override void Editor_InitInPoints() {

        }
        public override void Editor_InitOutPoints() {

        }
        public override void Editor_OnDrawTitle(out string _tooltip) {
            _tooltip = null;
        }
#endif

    }
}
Command 输出类型
我们之前已经学习过,可以通过在 Command 或 PropertyCommand 中传入泛型参数来定义一个 Command 的输出类型。
未指定类型的输出
那么,如果我们不传入任何泛型参数,会发生什么呢?
在这种情况下,GetOutput 将无法被重写,取而代之的是,我们可以重写 GetOutputBoxed。
        public override object GetOutputBoxed(CommandExecutionFlow _flow, int _pointIndex) {
            switch(_pointIndex) {
                case 0:
                    return (T)(object)"My returned string";
                default:
                    return null;
            }
        }
正如方法名所示,它涉及 boxing,也就是将值转换为 object 类型。这会带来内存分配,并可能产生轻微的性能开销。自 1.5.0 版本起,不再推荐使用这种方式,因为新的强类型 GetOutput 具有更高的性能。
###多类型输出
在之前的示例中,我们通过让 Command 继承 PropertyCommand<string> 来实现字符串输出。但如果这个 Command 还需要输出其他类型,例如 boolean 或 float,该怎么办?
在这种情况下,我们实际上可以添加多个泛型类型参数。现在就在已有的 MyTextsCommand 脚本中实现这一点。
在实现层面上,唯一的区别是 GetOutput 方法的返回类型会变为 OneOf,并且其泛型参数需要与类声明中的泛型参数保持一致。
...
public class MyTextsCommand : PropertyCommand<string, float, bool>
{
    public override OneOf.OneOf<string, float, bool> GetOutput(CommandExecutionFlow _flow, int _pointIndex)
    {
        switch(_pointIndex)
        {
            case 0:
                string text1 = "I am Text 1!";
                return text1;
            case 1:
                string text2 = "I am Text 2!";
                return text2;
            case 2:
                return true;
            case 3:
                return 50f;
            default:
                return 0f;
        }
    }

#if UNITY_EDITOR
    public override void Editor_InitOutPoints()
    {
        if (nextIds.Count < 1) nextIds.Add(new List<ConnectionTarget>());   //This is for text1 (pointIndex 0)
        CommandGUI.AddPropertyOutPoint<string>();

        if (nextIds.Count < 2) nextIds.Add(new List<ConnectionTarget>());   //This is for text2 (pointIndex 1)
        CommandGUI.AddPropertyOutPoint<string>();

        if (nextIds.Count < 3) nextIds.Add(new List<ConnectionTarget>());   //This is for pointIndex 2
        CommandGUI.AddPropertyOutPoint<bool>();

        if (nextIds.Count < 4) nextIds.Add(new List<ConnectionTarget>());   //This is for pointIndex 3
        CommandGUI.AddPropertyOutPoint<float>();
    }

    public override void Editor_OnDrawContents(Vector2 _absPosition)
    {
        CommandGUI.DrawOutPoint(0);
        CommandGUI.DrawLabel("Text1", true);
        CommandGUI.DrawOutPoint(1);
        CommandGUI.DrawLabel("Text2", true);
        CommandGUI.DrawOutPoint(2);
        CommandGUI.DrawLabel("Boolean Value", true);
        CommandGUI.DrawOutPoint(3);
        CommandGUI.DrawLabel("Float Value", true);
    }
#endif
}
理想情况下,在使用 GetInput 时,我们也应该传入 OneOf 类型来获取值,例如 GetInput<OneOf.OneOf<string, float, bool>>。这种方式在性能方面是最快的,并且不会产生额外的内存分配。
当然,我们仍然可以只使用其中某一种类型来调用 GetInput,例如 GetInput<string>。但此时数值会通过缓存的 Reflection 来获取,因此会带来轻微的性能开销。
...
public class PrintCommand : Command
{
...
    public override void Execute(CommandExecutionFlow _flow)
    {
        string value_textToPrint = GetInput<OneOf.OneOf<string, float, bool>>(_flow, 0, textToPrint).AsT0;
        Debug.Log(value_textToPrint);
        Exit();
    }
...